
Ten years ago, affordable audio interfaces usually meant noisy preamps, unstable drivers, and recordings that sounded like they were captured through a wall. That is no longer true. Even interfaces under $200 can now deliver studio-quality recordings for vocals, podcasts, guitars, and music production. And the gap between budget and professional gear has never been smaller.
That said, not all budget interfaces are equal. The market is full of options and the spec sheets are designed to make everything look impressive. Knowing which numbers actually matter, which brands have invested in driver quality, and which interfaces suit your specific recording workflow is what separates a purchase you will use for years from one you will replace in six months.
This guide covers everything you need to make that decision confidently: what to look for, which interfaces are worth your money in 2026, and the mistakes that cause most beginners to buy the wrong thing first time around.
What Is an Audio Interface?
An audio interface is a hardware device that connects professional microphones and instruments to your computer, converting the analog signals they produce into digital audio your recording software can capture.
Your laptop has a built-in sound card. It handles music playback and video calls adequately, but its preamps are weak, its converters introduce noise, and its drivers create too much latency for comfortable real-time recording. An audio interface replaces that built-in audio chain with something purpose-built for recording.
The key components on any audio interface:
- XLR inputs: accept professional microphones via three-pin XLR cables. The number of XLR inputs determines how many microphones you can record simultaneously.
- Phantom power (+48V): a 48-volt charge sent through the XLR cable to power condenser microphones. Essential if you are using a studio condenser rather than a dynamic mic.
- Gain knobs: control how much the preamp amplifies your microphone signal. Setting gain correctly is one of the most important skills in home recording.
- Headphone output: for monitoring your recordings in real time. A dedicated headphone output with its own volume control is standard on most interfaces.
- USB connection: connects the interface to your computer. Most budget interfaces use USB-A or USB-C and are bus-powered, meaning no separate power supply is needed.
Who Actually Needs an Audio Interface?
Not everyone does. If you are making occasional video calls or recording casual voice memos with a USB microphone, the difference may not justify the cost. But once you start recording seriously, an interface becomes essential rather than optional.
- Musicians and vocalists recording with XLR microphones need an interface. It is the required connection between a professional microphone and a computer. The quality of the preamp directly affects the quality of every vocal and instrument recording you make.
- Podcasters who want the sound quality and flexibility that XLR microphones provide will find a two-input interface far more capable than any USB microphone at an equivalent price. It also gives you a second input for in-person guests.
- Streamers and YouTubers often start with USB microphones and outgrow them. An audio interface opens up a wider range of microphones and gives you more control over your monitoring mix during a live stream.
- Voice-over artists working professionally rely on audio interfaces because the clean preamps and low noise floor of even a budget interface produce a noticeably more polished result than any consumer audio solution.
- Guitarists and producers recording instruments directly need an interface with a Hi-Z instrument input. This is a dedicated high-impedance input designed for guitar and bass signals. Most two-input budget interfaces include this.
If you are recording in an untreated room with significant background noise (generator hum, traffic, thin walls) your microphone choice and placement will affect your recordings more than the interface. A $150 interface in a well-treated space will outperform a $500 interface in a reverberant, noisy room every time.
What to Look for in a Budget Audio Interface
Understanding the following factors lets you evaluate any interface, including those not covered here.
Preamp Quality and Noise Floor
The preamp amplifies your microphone signal before it is converted to digital. A good preamp transparently adds gain without adding noise. A poor preamp introduces a background hiss called the noise floor, which becomes more audible the more you amplify the signal.
Noise floor is measured in EIN (Equivalent Input Noise), expressed in dBu. Lower numbers are better. A noise floor below -128 dBu is excellent for a budget interface. Above -120 dBu starts to become noticeable on quiet recordings.
This matters more than most spec sheets suggest. Two interfaces at the same price with the same inputs can sound meaningfully different based purely on preamp quality. And that difference shows up most clearly on quiet vocal recordings and acoustic instruments.
Latency and Driver Stability
Latency is the delay between making a sound and hearing it back through your headphones. High latency makes real-time monitoring uncomfortable. Poor driver stability causes crackling, dropouts, and crashes.
On Windows, your interface needs ASIO drivers (Audio Stream Input/Output) for low-latency recording. Generic Windows Audio drivers introduce 50–100 milliseconds of delay. This makes it unusable for real-time recording. Always check that an interface ships with proper ASIO driver support before buying.
On Mac, Core Audio handles audio processing natively. Most modern interfaces are class-compliant and work without additional drivers, though manufacturer software usually improves the experience.
One thing cheap, no-name interfaces consistently fail at is driver quality. They may have decent hardware but unstable or poorly maintained drivers that cause problems in DAW sessions. This is the area where spending slightly more on an established brand pays off most reliably.
For a full explanation of latency and how to fix it: What Is Latency in Audio Interfaces?
Number of Inputs and Outputs
For most beginners, a two-input interface is the right starting point. It handles one microphone and one instrument simultaneously, or two microphones for interview-style podcasting. Two inputs covers the vast majority of home studio recording scenarios.
Four or more inputs are worth considering if you regularly record multiple musicians simultaneously, run a multi-guest podcast, or want to connect more complex signal chains. But for solo vocalists, solo guitarists, and single-host podcasters, two inputs is all you need and paying for more is paying for something you will not use.
Phantom Power
If you are using a condenser microphone of which most studio vocal microphones are, your interface must provide phantom power (+48V). This is standard on virtually all modern audio interfaces, but always verify before purchasing, particularly at the lowest end of the price range.
Dynamic microphones like the Shure SM58 do not require phantom power. It is safe to leave phantom power enabled for condensers and off for dynamics. Most passive ribbon microphones should not receive phantom power to avoid permanent damage unless the manufacturer explicitly states otherwise. Active ribbon microphones often require it.
Not sure which type of microphone you have? See: Best Budget Microphones for Vocalists and Podcasters.
USB-C vs USB 2.0
A common misconception: USB-C does not automatically mean better audio quality. The connector type affects convenience and compatibility, not the quality of the audio conversion. An interface with USB-C is easier to connect to modern laptops with USB-C ports and may support faster data transfer, but an older interface with USB-A and a strong preamp will sound better than a USB-C interface with a weaker one.
What matters is the internal hardware (preamps, converters, and drivers) not the connector on the cable.
Build Quality
Budget interfaces typically use plastic chassis. Mid-range and above shift to metal. For a fixed home studio setup, plastic is fine. For an interface that travels, gets moved frequently, or is used in a live performance context, a metal chassis holds up considerably better.
Included Software Bundles
Many interfaces ship with bundled software; a lite version of a DAW, a collection of plugins, or virtual instruments. This can represent genuine value for a beginner who does not yet own recording software. Common bundles include Ableton Live Lite, Studio One Artist, Steinberg Cubase AI, and collections of plugins from companies like Waves, Softube, or Native Instruments.
Do not buy an interface primarily for its bundle. But if two interfaces are closely matched in audio quality and price, a stronger software bundle is a legitimate tiebreaker.
Best Budget Audio Interfaces in 2026
Tier 1 Recommendations
These three interfaces represent the best combination of value, audio quality, driver reliability, and beginner suitability at their respective price points.
Focusrite Scarlett 2i2 (4th Generation) – $230
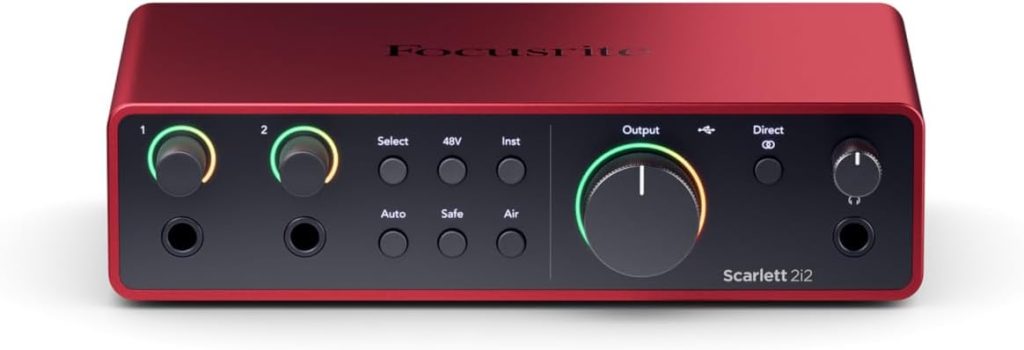
The Scarlett 2i2 is one of the most widely recommended beginner interfaces, and it has earned that position through consistency rather than marketing. Four generations in, Focusrite has refined the preamps, improved the converters, and maintained the driver quality that makes this the benchmark everything else is measured against.
Key specs:
- 2 XLR/line combo inputs
- 2 balanced line outputs
- 1 headphone output with dedicated volume knob
- 48V phantom power
- USB-C connection (bus-powered)
- 24-bit / 192kHz
- Air mode (adds harmonic presence to vocal recordings)
The 4th generation adds Air mode, a switch that introduces a subtle high-frequency lift that emulates the sound of Focusrite’s ISA transformer-based preamps. On vocals it adds a natural presence and clarity without needing EQ. It is a genuine improvement, not a marketing feature.
The noise floor is low enough for quiet acoustic recordings, and the gain range is wide enough to handle both dynamic microphones (which need more amplification) and condenser microphones (which need less).
Focusrite’s ASIO drivers are stable, well-maintained, and updated regularly. This matters more than most beginners realise, a cheaper interface with unreliable drivers will cause more frustration over time than the savings justify.
Ships with Ableton Live Lite, Pro Tools Artist (3-month subscription), Focusrite’s own plugin bundle, and access to Splice samples. Genuinely useful for a beginner building a complete setup.
This interface is best for Vocalists, podcasters, songwriters, and home studio beginners who want the most reliable starting point available. If you record one or two sources at a time and want something that works correctly from day one, this is the standard recommendation.
At a $230 price, you are paying partly for the Focusrite name and ecosystem, and partly for genuine driver reliability. If budget is tight, the PreSonus Studio 24c below at $160 delivers comparable audio quality for less.
PreSonus Studio 24c – $160
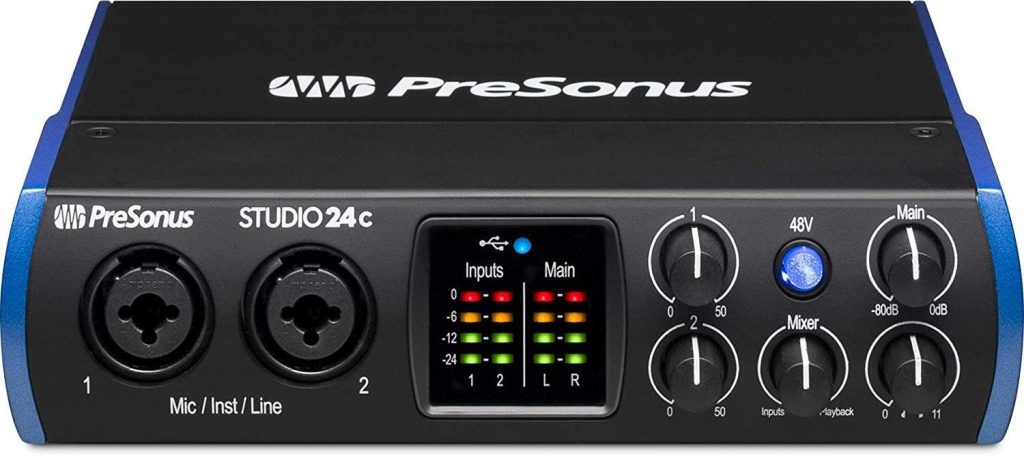
The PreSonus Studio 24c is consistently underrated in beginner interface roundups, overshadowed by the Scarlett’s name recognition. That undersells what it offers. It delivers clean preamps, solid driver support, and a genuinely useful software bundle, often at a lower price than its closest competitors.
Key specs:
- 2 XLR/TRS combo inputs
- 2 balanced TRS outputs
- 1 headphone output with dedicated level knob
- 48V phantom power
- USB-C connection (bus-powered)
- 24-bit / 192kHz
- XMAX-L solid-state preamps
The XMAX-L preamps are PreSonus’s entry-level design, but they perform well for the price. They are clean, transparent, and provide enough gain for both dynamic and condenser microphones. The noise floor is competitive with the Scarlett 2i2.
Latency performance is good on both Mac and Windows. PreSonus’s drivers are stable and the interface has been on the market long enough to have any major issues ironed out through firmware updates.
It ships with Studio One Artist, a full-featured DAW with no track limits, along with a collection of PreSonus plugins and virtual instruments.
Suitable for home studio beginners who want solid preamp quality and a full DAW included without paying the Scarlett premium. Particularly good value for vocalists and podcasters on a tighter budget who do not want to compromise on core audio quality.
The Studio 24c is less well-known than the Scarlett, which means a smaller community of tutorials and troubleshooting resources. For a complete beginner who needs to follow guides, the Scarlett’s larger user base can be a practical advantage.
Steinberg UR22C – $200
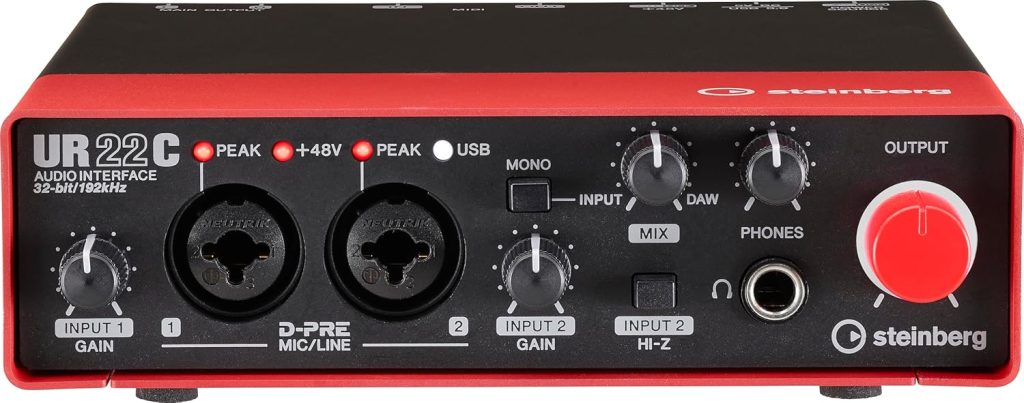
The Steinberg UR22C is the interface that consistently surprises people who try it alongside the more famous Focusrite options. Its D-PRE preamps which are based on Yamaha’s professional preamp design, deliver a warmth and depth that stands out at this price point, particularly on vocal recordings.
Key specs:
- 2 XLR/TRS combo inputs
- 2 balanced TRS outputs
- 1 headphone output
- 48V phantom power
- USB-C (USB 3.0) connection (bus-powered)
- 32-bit / 192kHz
- D-PRE Class A microphone preamps
- DSP effects for zero-latency monitoring (reverb and channel strip)
The D-PRE preamps are the main reason to consider this interface over the Scarlett 2i2 at a similar price. They have a slight warmth and character that flatters vocals, particularly on singers who find bright, clinical-sounding preamps unflattering. If you care about the character of the preamp and not just its noise floor, the UR22C is worth a close listen.
DSP processing is an unusual feature at this price. The UR22C can apply reverb and a basic channel strip (EQ, compression) through the hardware during direct monitoring, meaning you hear yourself with reverb in your headphones while recording dry to the DAW. For vocalists who need a touch of reverb to perform comfortably, this is a practical and well-implemented feature.
Comes with Steinberg Cubase AI, a capable DAW with more features than Ableton Lite, though with a steeper learning curve. Also includes the Backbone drum software.
This interface is best for vocalists and producers who want a warmer preamp character than the Scarlett’s more clinical transparency. Particularly suited to singers recording in untreated rooms who benefit from the DSP reverb monitoring feature.
Steinberg’s driver history on Windows has been less consistent than Focusrite’s at times. Check for recent driver updates and user reports for your specific Windows version before purchasing.
Tier 2 Alternatives Worth Considering
These interfaces each have a clear reason to choose them over the Tier 1 picks in specific situations. Covered concisely but honestly.
MOTU M2 – $200
The MOTU M2 has developed a strong reputation among more technically minded home studio users for one specific reason: its converters. MOTU is primarily known for professional studio gear. The M2 measures exceptionally well for its price, with very low noise and strong converter performance.
The large colour LCD meters on the front panel are a practical differentiator as they give you a clear, accurate reading of your input levels without squinting at small LEDs. For gain staging (setting your levels correctly), this is more useful than it first appears.
Suitable for producers and engineers who prioritize converter quality and want the lowest noise floor available at this price point. Less beginner-friendly in terms of software bundle, ships with nothing beyond a basic DAW trial.
Audient iD4 MKII – $250
The Audient iD4 MKII uses a single-channel version of Audient’s console preamp similar to preamp design found in their professional mixing consoles. The result is a preamp quality that consistently outperforms everything else at this price point on a per-channel basis.
The large physical scroll wheel doubles as an input gain knob and a DAW controller, which feels more premium than its price suggests. Build quality is metal throughout.
The Audient iD4 MKII interface is best for solo vocalists and acoustic instrument recordists who want the best single-channel preamp quality available under $300 and are willing to pay slightly more for it. Less practical if you need two simultaneous inputs regularly.
SSL 2 – $230
Solid State Logic (SSL), is one of the most respected names in professional audio, responsible for the console sound behind countless classic recordings. The SSL 2 brings their Legacy 4K preamp character to a budget interface. It adds a subtle harmonic density to vocals and instruments that most budget interfaces do not offer.
The 4K button on each channel engages this harmonic enhancement. On some voices and instruments it adds a pleasing presence. On others it is unnecessary. Worth experimenting with rather than leaving on all the time.
The SSL 2 is suitable for producers and musicians who want analogue character in their recordings and are interested in the SSL legacy. The preamp character is a genuine differentiator, not just branding.
Universal Audio Volt 2 – $200
Universal Audio’s main contribution at this price point is the Vintage mic preamp mode, a setting that introduces harmonic saturation modelled on classic tube preamps. Like the SSL’s 4K mode, this adds colour and warmth rather than pure transparency.
UA also includes a solid software bundle. A UA plugin subscription trial and access to Ableton Live Lite. Driver quality is good on both Mac and Windows.
Suitable for Vocalists and producers interested in analogue-style warmth at a budget price. The Vintage mode is subtle but real, worth trying on vocals before deciding whether it suits your recording style.
Arturia MiniFuse 2 – $190
The Arturia MiniFuse 2 is the most compact two-input interface on this list and the most travel-friendly. Metal chassis, USB-C, and solid preamps in a form factor small enough to slip into a laptop bag without noticing.
Arturia bundles their own Analog Lab Lite software. A collection of vintage synthesiser sounds, alongside Ableton Live Lite. Less useful for vocalists and podcasters, more useful for producers who also play keys.
Focusrite Scarlett Solo (4th Generation) – $170
Everything that makes the Scarlett 2i2 the default recommendation, the preamp quality, the driver stability, the Air mode, the software bundle, in a one-input version for $60 less.
If you record only one source at a time and have no realistic use case for a second input, the Solo saves you money without compromising audio quality. The preamp on channel 1 is identical to the 2i2.
Best for Solo vocalists, solo podcasters, and single-instrument recordists who are certain they will never need two simultaneous inputs.
The Solo has instrument input only on channel 2 (line level, not a full XLR/combo). If you want to record both a microphone and a guitar simultaneously, the 2i2 is the correct choice.
Behringer UMC204HD – $120
The Behringer UMC204HD is the most affordable genuinely functional interface on this list. Two XLR inputs, phantom power, 24-bit/192kHz, and a MIDAS-designed preamp, Behringer’s partnership with MIDAS (a respected pro audio brand) elevates the preamp quality above what the price suggests.
It is not as refined as the Focusrite or PreSonus options. The build is entirely plastic, the drivers require more careful installation on Windows, and the noise floor is slightly higher than the Tier 1 picks. But for someone on an absolute budget limit who needs a functional two-input XLR interface, it works.
Driver setup on Windows can be more involved than plug-and-play alternatives. Budget extra time for initial setup and keep the Behringer support documentation handy.
Budget Audio Interfaces vs Expensive Interfaces
This is a question worth answering honestly because the answer affects your buying decision significantly.
Budget interfaces like the ones on this list, from $120 to $280, do several things surprisingly well:
Preamp quality at two channels is genuinely competitive with interfaces costing two to three times more. The Audient iD4’s single-channel preamp, for example, uses the same circuit design as Audient’s professional consoles. The gap between a $200 interface and a $600 interface on raw two-channel vocal recording is smaller than the marketing suggests.
Budget converter quality has improved substantially over the last decade.
Where more expensive interfaces genuinely win:
- More inputs with consistent quality: Budget interfaces offer two clean channels. Professional interfaces offer eight, sixteen, or more, all with preamps of equivalent quality. For recording a live band or a full drum kit, there is no budget solution.
- DSP processing power: High-end interfaces run significant DSP chips that handle complex effects, routing, and monitoring mixes without touching the computer’s CPU. This matters in large professional sessions. It rarely matters in a two-person home studio.
- Premium preamp character: Interfaces from Universal Audio, Neve, and API at $500–$2000+ have preamp circuits built around genuinely rare components with specific tonal characters that professional engineers choose deliberately. The difference is real but meaningful primarily to engineers who have trained their ears to hear it.
- Driver robustness at scale: Professional interfaces maintain stable performance in large sessions with 30+ tracks and heavy plugin loads. Budget interfaces can struggle here.
For most bedroom studios and home recording setups, room acoustics and microphone technique will affect sound quality far more than upgrading from a $200 interface to a $1,000 one. The diminishing returns above $250 are real, and for the use cases covered in this guide; vocals, podcasting, guitar, and streaming, a budget interface is not a compromise. It is the appropriate tool.
Latency Comparison
| Interface | Connection | Typical RTL at 128 samples | Driver Quality |
|---|---|---|---|
| Focusrite Scarlett 2i2 4th Gen | USB-C | ~6–8 ms | Excellent |
| PreSonus Studio 24c | USB-C | ~7–9 ms | Very good |
| Steinberg UR22C | USB-C (3.0) | ~5–7 ms | Good |
| MOTU M2 | USB-C | ~5–7 ms | Excellent |
| Audient iD4 MKII | USB-C | ~6–8 ms | Very good |
| SSL 2 | USB-C | ~7–9 ms | Good |
| Universal Audio Volt 2 | USB-C | ~7–9 ms | Good |
| Arturia MiniFuse 2 | USB-C | ~7–9 ms | Good |
| Focusrite Scarlett Solo | USB-C | ~6–8 ms | Excellent |
| Behringer UMC204HD | USB | ~8–12 ms | Moderate |
RTL = Round-Trip Latency. Values approximate and vary by computer hardware and DAW configuration.
All figures are comfortably below the 20 ms threshold where latency becomes disruptive during recording. The Behringer’s higher figure reflects USB 2.0 and driver differences but is still workable with direct monitoring enabled.
Mistakes To Avoid When Buying an Audio Interface
These are the purchasing and setup errors that show up repeatedly in home studio forums and support threads.
1. Buying more inputs than they need
A four-input or eight-input interface sounds like future-proofing. In practice, most home studio users record one or two sources simultaneously for years. The extra inputs add cost without adding value for the actual workflow. Start with two inputs and upgrade when a specific need demands it.
2. Choosing based on specs alone
A 32-bit/192kHz spec looks impressive on a product page. In practice, 24-bit recording is standard professionally, while 44.1kHz and 48kHz are the most common sample rates depending on the workflow. Noise floor (EIN), preamp quality, and driver stability are more meaningful than maximum sample rate numbers.
3. Ignoring driver quality
This is where no-name budget interfaces consistently disappoint. An interface with good hardware but unstable or poorly maintained drivers will cause crackling, dropouts, and DAW crashes that erode the recording experience. Sticking with established brands like Focusrite, PreSonus, Steinberg, MOTU, Audient is not brand loyalty, it is risk management.
4. Pairing an expensive interface with cheap headphones
The interface handles input quality. The headphones handle what you hear during monitoring and mixing. A pair of headphones, like the Audio-Technica ATH-M50x or Sony MDR-7506, reveals what your recordings actually sound like. Cheap consumer headphones with boosted bass give you a flattering but inaccurate picture that leads to poor mixing decisions.
5. Forgetting about phantom power requirements
Condenser microphones require +48V phantom power. If you buy a condenser microphone and an interface without phantom power, the microphone will not work. Every interface on this list includes phantom power, but it is worth verifying on any interface you research independently.
6. Recording in completely untreated rooms without adjusting expectations
A $300 interface in a room with hard parallel walls and no acoustic treatment will produce recordings with noticeable room echo and reverb. No interface can fully compensate for poor room acoustics. Basic treatment (recording in a wardrobe, using heavy curtains, positioning yourself correctly relative to reflective surfaces) improves results more than any equipment upgrade.
Note that USB 3.0 does not automatically guarantee lower latency than USB 2.0. Driver optimization and firmware design matter far more. In practice, many excellent low-latency interfaces still operate over USB 2.0.
Interfaces to Approach with Caution
Without naming specific products, there are categories of interfaces worth avoiding regardless of price:
1. No-name interfaces without ASIO driver support on Windows
If a product page does not mention ASIO drivers and the brand has no meaningful customer support presence, budget for driver problems. Class-compliant operation on Mac is common, but without ASIO on Windows the latency will be too high for real-time recording.
2. Interfaces with no user community or firmware update history
Audio interface drivers and firmware need maintenance as operating systems update. Brands that release a product and never update the drivers create interfaces that stop working correctly as Windows and Mac OS versions advance.
3. Interfaces marketed primarily on sample rate specs
32-bit/768kHz recording sounds impressive. In practice, the audio quality difference above 24-bit/96kHz is not audible in normal recording and monitoring conditions, and chasing maximum specs at the expense of preamp and driver quality is a poor trade.
4. Extremely cheap combo products
Interfaces bundled with a microphone, headphones, a boom arm, and a pop filter for $60–$80 total are invariably worse than buying each component separately at a sensible budget. The interface in these bundles is almost always the weakest link, with noisy preamps and poor driver support.
How to Set Up An Audio Interface
Once you have chosen and received your interface, setup follows the same process regardless of the brand:
1. Install manufacturer drivers before connecting the interface. On Windows this is essential, install ASIO drivers first, then connect the hardware. On Mac, many interfaces are plug-and-play but installing the manufacturer’s app is still recommended for firmware updates and monitoring control.
2. Connect the interface via USB to a direct port on your computer, not through a hub. Confirm the interface is recognised in Device Manager (Windows) or Audio MIDI Setup (Mac).
3. Connect your microphone via XLR cable to input 1. Enable phantom power if using a condenser microphone.
4. Open your DAW and set the audio device to your interface in the audio settings. Set sample rate to 44.1kHz or 48kHz and buffer size to 128 samples for recording.
5. Set input gain by speaking at normal volume and adjusting the gain knob until peaks sit between -18 dB and -6 dB on your DAW meter. Never allow the signal to hit 0 dB.
6. Enable direct monitoring for zero-latency headphone monitoring while recording.
7. Record a short test and play it back to confirm the signal is clean, at a good level, and free of noise or clipping.
For DAW recommendations, check this article Free Music Production Software for Windows. And for mixing after recording checkout Essential Music Mixing Plugins for Beginners.
Realistic Home Studio Setups by Budget
Under $500 (Complete Beginner Setup)
- Interface: PreSonus Studio 24c (~$160)
- Microphone: Audio-Technica AT2020 (~$150)
- Headphones: Sony MDR-7506 (~$115) or Audio-Technica ATH-M20x (~$70)
- DAW: Studio One Artist (included with interface)
- Total: ~$410–$430
This setup produces professional-quality vocal and podcast recordings. The Studio 24c’s included DAW eliminates one cost entirely, and the AT2020 is a proven, neutral condenser that suits most voices.
Under $600 (Upgraded Beginner Setup)
- Interface: Focusrite Scarlett 2i2 4th Gen (~$230)
- Microphone: Audio-Technica AT2035 (~$159)
- Headphones: Audio-Technica ATH-M50x (~$150)
- DAW: Ableton Live Lite (included) or Reaper
- Total: ~$540–$600
A significant step up in microphone quality and monitoring accuracy. The AT2035 is a more refined condenser than the AT2020, and the M50x headphones give you accurate monitoring that translates well to other playback systems.
Under $1000 (Serious Home Studio Setup)
- Interface: Steinberg UR22C (~$200) or MOTU M2 (~$200)
- Microphone: RØDE NT1 5th Gen (~$229)
- Headphones: Sony MDR-7506 (~$115)
- Studio monitors: Yamaha HS5 (~$400/pair) or KRK Rokit 5 G4 (~$400/pair)
- DAW: Cubase AI (included with Steinberg) or preferred paid DAW
- Total: ~$950–$990
At this level you are building a setup capable of professional commercial results. The RØDE NT1’s exceptionally low self-noise makes it ideal for quiet recording environments, and adding studio monitors to the chain gives you a proper mixing environment beyond headphone-only work.
Which Budget Audio Interface Should You Buy?
The best budget audio interface is not the cheapest one. It is the one that fits your recording workflow, comes from a brand with reliable drivers and ongoing support, and does not create technical limitations you will hit within the first year of using it.
By budget
- Behringer UMC204HD (functional, alternative, worth it if budget is the genuine constraint)
- PreSonus Studio 24c or Focusrite Scarlett Solo (Good spot for quality and value)
- Focusrite Scarlett 2i2, Steinberg UR22C, or MOTU M2 (step up in preamp quality, driver reliability, and features)
- Audient iD4 MKII or SSL 2 (for specific preamp character preferences)
By use case
- Solo vocalist or podcaster: Focusrite Scarlett Solo or PreSonus Studio 24c
- Interview podcasting or two simultaneous inputs: Focusrite Scarlett 2i2
- Guitar and instrument recording: Steinberg UR22C or MOTU M2
- Warmth and analogue character: SSL 2 or Universal Audio Volt 2
- Mobile and travel recording: Arturia MiniFuse 2
- Best single-channel preamp quality: Audient iD4 MKII
For most beginners reading this guide, the Focusrite Scarlett 2i2 or PreSonus Studio 24c covers every realistic use case with room to grow. Both deliver clean, professional recordings, reliable drivers, and software bundles that eliminate additional setup costs. Start with one of these and invest the remaining budget in your microphone, your headphones, and the time spent learning your room.